Self-Service Single Sign-On
Self-Service Single Sign-On (SSO) provides business-to-business (B2B) customers with the tools needed to delegate SSO setup to their enterprise customers. By delegating this task, you can streamline your onboarding process and grant customers more autonomy over their sign-on experience. You can also reduce the time and costs associated with managing SSO across your customer base.
Self-Service SSO requires minimal configuration in your Auth0 tenant and provides your customers with a setup assistant that guides them through the enablement process. After a customer completes their setup, the SSO integration is automatically added to your tenant as an Enterprise connection.
Supported Providers
Self-Service SSO currently supports the following identity providers:
Okta Workforce Identity (using OIDC)
Entra ID
Google Workspace (using OIDC)
Keycloak
Microsoft Active Directory Federation Services (ADFS)
PingFederate
Generic OIDC
Generic SAML
Self-Service Provisioning currently supports the following identity providers:
Okta Workforce Identity (using OIDC)
Entra ID
Generic OIDC
Generic SAML
How it works
Self-Service SSO uses the following components to delegate setup to your customers:
Self-service profile: Defines key elements of customer SSO implementations, such as the identity providers they can use for SSO and which user attributes they must capture, such as email. You can create up to 20 profiles in your tenant for different customers or segments.
Self-service access ticket: Grants customer admins access to the self-service assistant and sets specific details for the resulting Enterprise connection. Customer admins can either create new or modify existing connections.
SSO setup assistant: Guides customer admins through the SSO setup process. To learn more about this experience, review Self-service assistant experience.
Self-Service SSO workflow
The steps below provide the general workflow for using Self-Service SSO. These tasks can be completed through either the Management API or the Auth0 Dashboard.
You (the Auth0 customer) create a self-service profile in your tenant.
You then create a self-service access ticket associated with that self-service profile. When generating the ticket, you can decide whether the customer admin will create a new connection or modify an existing connection through the self-service assistant.
You retrieve the ticket URL from the asset created in Step 2 and send the link to your customer admin.
Your customer admin launches the self-service assistant via the ticket URL and follows the steps provided to configure their connection and optionally complete domain verification.
A new or updated Enterprise connection pointing to the customer’s application becomes available in your Auth0 tenant.

Self-service assistant experience
The self-service assistant is a multi-step experience that guides customer admins through configuring SSO and optionally verifying their domain. This experience includes both interactive elements as well as instructions for making the appropriate changes in their selected IdP system.
While the exact requirements for configuring SSO vary by IdP, the general workflow for the self-service assistant includes the following:
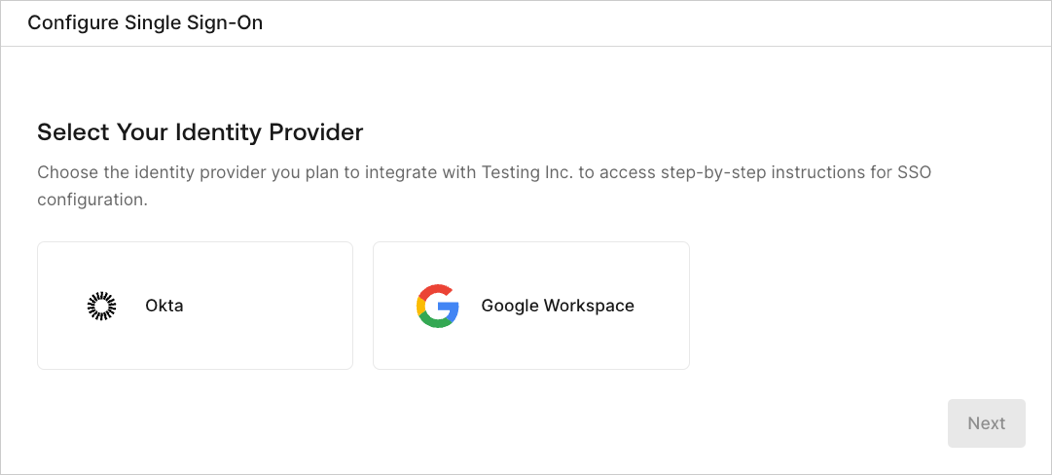
Select Identity Provider: The customer admin selects which IdP to configure for SSO. The list of options the customer admin can choose from is determined by the associated self-service profile.
Create Application: The customer admin follows the written instructions to create an application in their selected IdP system.
Configure Connection: The customer admin completes a brief form to create or modify a connection in Auth0. This form collects information such as the customer’s domain, client ID, and client secret.
Claims Mapping: The customer admin reviews the required and optional user attributes they must capture through their SSO connection. Then, they map these user attributes, or claims, in their IdP system.
Assign Access: The customer admin follows the written instructions for their IdP system to grant users or user groups access to your application.
Test SSO: The customer admin uses the button provided to test their SSO connection in a new tab. Unless domain verification is enabled, the customer admin can complete the setup process after this step to enable their connection.
(Optiona) Provisioning: The customer administrator configures user provisioning for their connection by following the provided instructions:
Create the application in their IdP.
Generate a SCIM bearer token in the assistant and copy the SCIM bearer token and SCIM endpoint URL into their IdP’s configuration.
Review the required and optional attributes defined in the User Attribute Profile (UAP). Map these attributes to the corresponding SCIM fields in their IdP system.
(Optional) Domain Verification: The customer admin provides their domain and submits it for verification. Domain verification helps enhance overall security by ensuring customers provide legitimate domains during setup. Depending on how you (the Auth0 customer) configured domain verification when generating the access ticket, this experience can vary for customer admins:
If domain verification is set to Required: The customer admin must complete domain verification before they can enable the connection.
If domain verification is set to Optional: The customer admin can choose to either enter their domain for verification or skip this step. In both cases, the customer admin can enable their connection regardless of its verification status.
If domain verification is set to Off: If domain verification was not enabled at all, this step does not appear to the customer admin and their flow ends with Step 6 above. To learn more, review Manage Self-Service SSO.
Example self-service assistant flow
The images below demonstrate an example self-service assistant experience. In this example, a customer admin configures SSO with Okta Workforce as their IdP.
1. Select Single Sign-On

2. Select Identity Provider

3. Create Application (truncated)

4. Configure Connection

5. Claims Mapping

6. Assign Access

7. Test SSO

8. Provisioning - Create Application

9. Provisioning - Configure SCIM

10. Provisioning - SCIM Mapping

11. Domain Verification

Using Self-Service SSO
To learn how you can use Self-Service SSO for your customers, review Manage Self-Service SSO. This resource provides technical information for creating self-service profiles and managing access tickets, as well as useful reference information such as rate limits.